WP Real Estate Theme Documentation

Get Started


Chimp Studio team warmly welcome you as our valued client. While utilizing WP Real Estate Theme, If you have any inquiry or question, we are here to help you.
Chimpstudio support team respond to buyers’ questions and provide limited support through Chimp Support portal. Our clients are our assets so we provide them top priority support to keep them satisfied. Although, support includes:

  • Responding to questions or problems regarding the item and its features
  • Fixing bugs and reported issues

Item support does not include:

  • Customization and installation services
  • Support for third party software and plug-ins

Supporting items is not a requirement of the Envato Market places, but if you need support in any matter related to theme, Our help desk is there. We usually respond to support ticket within 24 hours on weekdays, depending on the number of requests in queue. Support request sent during weekends/holidays will be processed on Monday/the next business day.

Installing WordPress


To install WordPress, follow instructions here. WordPress Installation Guide

Attention! WordPress installation is primarily your concern. If you encounter any problem on it, Visit www.wordpress.org & troubleshoot the issue.

Downloading WP Real Estate Theme


First, after purchasing WP Real Estate Theme, please download the package from Theme Forest. All you need to do is to move your mouse over your login name in right top corner (of course after you`re logged in Themeforest) and then click Download. Here you will find all the items that you have purchased.
In the next step click the Download > Main File(s) button next to Real Estate Theme and save package on your computer.

Please unpack (unzip) the whole package after downloading it from ThemeForest. In the package, You will find Documentation, license, zipped file with theme files and folder called Real Estate Theme.

Note: You can upload .zip files in this method of theme installation. No other format is accepted there, and, result will be error in installation.

Installing WP Real Estate Theme via WordPress Dashboard


Note. Make sure, you have following PHP.ini configurations on your server to avoid any memory exhaust issue while uploading theme via WordPress dashboard.

upload_max_filesize = 256M or Greater.
memory_limit = 256M or Greater.
post_max_size above 256M

Follow the steps below to install the theme via WordPress;

Step 1 – Navigate to Appearance > Themes.
Step 2 – Click Install Themes and hit the upload button.
Step 3 – Find the “Home Villa's.zip” file on your computer and click “Install Now”
Step 4
– Once uploaded, activate the theme. Go to Appearance > Themes and activate it.
Step 5 – Then you will see a notification message to activate the required & recommended plugins. Follow the steps to install and activate each plugin.

Attention ! You can upload .zip files in this method of theme installation. No other format is accepted there, and, result will be error in installation.

Plugin Installation


With the activation of Real Estate theme, you are prompted with admin notices that certain plugins are required for the theme. Following plugins are need to be activated for Real Estate theme to work properly.

  1. WP Real Estate Manager(Required) Helps you setup custom post types offered with Homevillas theme
  2. Real Estate Manager Framework  (Required)
  3. Contact From 7 (Optional) This theme have custom contact form. For extended contact forms, activate this plugin. 
  4. Envato WordPress Toolkit (Optionalview your ThemeForest purchases within the WordPress dashboard and quickly update your theme without losing any data & settings of theme.
  5. Woocommerce (Optional) used to have shop features on your site.

You can activate these plugins by two methods;

1- Click the “Install Plugin” link which comes along with the admin notices to activate these plugins.
2- If you are prompted with any admin notices, you can activate these plugins by navigating to  Appearance > Install Plugins section. 

Note: Required plugins must be activated, otherwise theme will not function properly. However, optional plugins are your choice. Activate them only if they are required.

Installation Via FTP


Note: Before uploading theme via ftp, Make sure following configurations for Filezilla to avoid any code minification while uploading theme.

Setting for FileZilla FTP client
1- Click Edit >> Setting
2- In settings pop up. Look for Transfers >> File types >> Auto will be selected.
3- Change it to Binary
4- Save Settings

After these settings start uploading your theme. Follow following steps to upload your theme via ftp.

Step 1 – Connect/Login to your hosting via FTP software (FileZilla, CuteFTP etc). Once you have downloaded and installed the program you’ll be able to launch the program.
Step 2 To configure FileZilla to connect to your website please select  “File” then“Site Manager”.
Step 3. A “Site Manager” window will show up.  Click on the “New Site” button and enter a name for the new connection settings. (You can name it  anything, but best to name with your domain name to keep it straight so that you know where it takes you to).
Step 4.   Now you need to fill in your FTP account information in the box on the right side of the screen.  Please enter “Host name” ( ftp address),  “Server Type” ( FTP),  “User Name and Password” ( your web host account password) which are all available from your webhost.

Step 5.
Then click on “Connect” and cross your fingers that you have entered the correct information in the right boxes. If you  entered the information correctly it will connect with your server and populate the area on the right side of the program with folders that shows your website files on the server, ( the left side of the screen displays and gives you access to your local folders on your computer.
Step 6. One of the folders you see is your website main directory.  Typically if your webhost uses a cPanel server, your main root directory is called “public_html”.Your WordPress files should be in that file. The main WordPress files that a beginner needs to work with  is in a folder called “wp-content”. This is the file where you will find you “Plugins” folder as well as your “Themes” folders.
Step 7. To get new plugins or themes added to your WordPress Install through FTP, download zipped files of  plugins and or themes to your computer. When downloaded, extract them to a file on your computer. Drag the unzipped plugin or theme files, individually into either the plugin or the theme file as the case may be.
Step 8. Go to  the WordPress dashboard and go to “Appearance”, “Themes” and see that your new theme now shows up in the list of themes. The downloaded theme should be there. If not refresh, and it should appear ready to be activated. The same with Plugins. The downloaded Plugin should be in the list of “Plugins”and then you must activate it and configure each one as necessary.

Attention! If you face any problem in uploading purchased theme, just navigate FAQ's section to get appropriate solution if still problem persists open a ticket and Chimp Studio team is there to help at Chimp Support.

Import Demo Data


Real Estate theme is flexible enough to make you love it from the first steps!With our Enhanced and More advance “Import Demo Data” feature helps you install demo data and  you can setup this theme just like our demo.Follow these steps:

Step1. Login to your admin panel & navigate to Appearance, click it.

Step2. Click on Import Demo Data, you will see our demo page with serve requirements, make sure you satisfy them all and are ticketed green.

Step3. Click Next Step you will be prompted to enter your purchase code, Enter your purchase code and our system will verify it with Envato, once verified you will see demo list for selection.
Note: you can get your purchase code from your ThemeForest dashboard under downloads.

Step4. Select a demo from the list and click Next Step and our importer will show list of options to import you can select all or choose as per your need, once selected click
Next Step and our importer will start importing demo data.

Note: It can take between 10 - 15 minutes, may be longer depending upon server resources and internet connectivity , to import demo data .
Images from preview are not included in demo data. Dummy images will show instead of demo images BUT design element structure will remain as demo. Have Fun!

Manual Import Demodata


Step 1- Go to WordPress admin panel and move the pointer of mouse to the “Tools” button click it once, it will open options for you.
Step 2- Move to “Import” button and click it. As the next window pops-up, select “WordPress” for import.
Step 3- There may be a need to install plugin for import. If plugin is not installed already, just Click “Install Now”. Activate the plugin and run the importer.
Step 4- Choose the sample content file and upload it. Remember; do not select a .zip or unzipped folder. The demo content is always a file with .xml extension, for example sample-content.xml.
Step 5- On the next screen, check the box saying “Download and import file attachments”. Click “Submit” and get a coffee. The process of installing the sample content involves downloading images and other files from the installation source, which are often the theme preview installations of the theme provider. Do not interrupt the process.
Attention! Uploading Dummy Data is time taking process. Do not open any other section of your website. It may hinder the process.

Demo Images for Home Villa’s


We do not provide images with the package. All images have copyright © regulations which do not allow their reuse. Images that come with the theme are dummy images only.

Thumbnail Sizes


If you are migrating from another theme which uses the native featured images functionality of WordPress, please use the Regenerate Thumbnails plugin to resize all the thumbnails. Click the link and download free Regenerate Thumbnails plugin  , read thoroughly all the steps it contains for any kind of assistance. The plugin documentation/help file contains all the information you need.

How to Upgrade Theme?


Keep your theme update to the latest version in order to get all features as per theme's live demo. To update your theme to latest version follow following simple steps:

  1. Maintain Complete backup of your site and database before theme update in order to avoid any potential data loss.
  2. Go to theme forest download dashboard, select "Download all Files", get
    the latest updated files.
  3. Deactivate the previous theme version from WordPress Dashboard > Appearance > Themes > Deactivate Theme
  4. Upload Latest updated theme version on your site via ftp or WordPress dashboard as feel comfortable.
  5. Activate the theme and its all Done!

WP Real Estate Manager


Listings


You can add your listings in  WP Real Estate theme by follow the path:- Navigate to admin panel and click on Dashboard > WP Real Estate Manager > Listings, Click the button “Add New Listing”.

Listing Options:

-Listing Type: Select your listing type.
- Ad Price Option: Select price on your ad , Price Or On call.
-Price type: Select Price Type from Drop down.
-How would you describe the*: (Required) Select your categories from Drop Down.
-Select Tags: Select listing type suggested tags from this drop down.
-Listing Summary: Add Description of Your listing.

Custom Fields

-Bedrooms: Select number of bedrooms from your listing.
-Bathroom: Select number of Bathrooms from your listing.
-Garage: Select number of Garage  from your listing.
-Area Sq. Ft.: Add your area square feet in numbers.
-Tenure: Select the status of your property.

Features

-Features: Select features for your listing.

Open House

-Date: Select Date for Open House.
-Time From: Select Time from Drop Down.
-Time To:Select Time from Drop Down.

Images Gallery

-Image Gallery: Add your image gallery for your property listing.

Services

-Services: Add your services In your listing.

Files Attachments

-Title*: Add your File Title.
-files-attachment*: Attach your files against your listing.

Floor Plans

-Title: Add Title of floor plan.
-floor plan image: Add floor plan image of  your listing.
-Description:  Add Floor plan description.

Apartment for sale

-Apartment for sale: Add your apartment for sale.
-Plot : Add no.of Plots.
-Bed: Add no.of Beds.
-Price from : Add Price.
-Floor: Add Floor number.
-Building/Address: Add Address of your Building.
-Availability: Select option from Drop down.
-Apartment Link:  Add Apartment  Link.

Property Video

-Property Video: Add your property video in your listing.

Mailing Information

- Country: Select your country 
-State: Select your state.
-City: Select your city .

Find on Map

-Address: Enter a Location.
-Latitude: Enter a latitude.
-Longitude: Enter a longitude.
-Exact Location/Radius: Enable/Disable exact location/Radius button.

Contact Information

-Email: Enter your email address.
-Phone Number: Enter phone number.
-Web: Enter your website link.
-Page Style: Select your page style.

Package Information:

-Transaction Id:  Add your transaction id against your listing.
-Posted on: Select your current posted on the date for your listing.
-Expired on: Select your future expired date for your listing.
-Package: Select your payment package against your listing
-Status: Set your listing status, "Active ", "Inactive" Or  " Awaiting for activation"
-Featured: Enable or Disable this button for your featured ads.
-Top Category: Enable or Disable this button for your Top categories.
-Number of Services: Add the number of services for your listing.
-Number of Pictures: Add the number of pictures for your listing.
-Number of Documents: Add the number of documents for your listing.
-Number of Tags: Add the number of tags for your listing.
-Reviews: Enable or Disable this button for listing reviews.
-Phone Number: Enable or Disable this button for the Phone number.
-Website Link: Enable or Disable this button for the Website link.
-Social Impressions Reach: Enable or Disable this button for social logins.
-Respond to Reviews: Enable or Disable this button for respond to reviews.
-Features Element: Enable or Disable this button for listing features.
-Video Element: Enable or Disable this button for Video elements.
-Yelp Places Element: Enable or Disable this button for listing nearby places.
-Apartment For Sale Element: Enable or Disable this button for listing Appartments.
-File Attachments Element: Enable or Disable this button for listing file attachments.
-Floor Plan Element: Enable or Disable this button for listing reviews.
-Select Agent : Select the Agent from your drop down menu.
-Select User: Select the user from the drop down menu.

Listing Types


You can add listing types for your Real Estate listings in Real Estate by follow the path:
- Navigate to admin panel and click on Dashboard > WP Real Estate Manager >listing types
Click On  “Listing types”.


General Settings

You can  add listing types in your listings from Real Estate theme by follow the path:
- Navigate to admin panel and click on Dashboard > WP Real Estate Manager >listing types
Click On  “Listing types”.

-Listing Type Icon / Image: Select your listing image.

-Listing Icon: Select your listing Icons.
-Listing Type Menu Icon / Image: Select your listing type menu /Icon.
-Listing Menu Icon: Select your listing menu Item.
-Map Marker Image: Select your map marker image.
-Search Result Page: Select your search result page for your listing.-Opening Hour Time Laps ( In Minutes ) : Enter Opening hours Time only in numbers.

Categories:

Select Categories: Select listing type categories from this dropdown.


Custom Fields:

Home villas listing types offer special custom fields with default features of listings that user can get benefit from them.

User can add the text field, number field, text area, dropdown field, date field, email field, section fields , URL field and range fields according to the listing requirements.


Form Builder:

You can create your own custom form according to the estate listing requirement by using the form builder element with multiple options.

- Form Title: Enter a suitable form title in your custom form title filed.
- Form Button Label: Enter a button label text in your button label field.
- Form Terms Link: Enter your term and conditions link in this description field according to your listing scenario.
- Form page builder fields:  you can create your own custom form for your listing according to the listing specification by using the default form elements.
 

Features:

- Show all Feature Options:  If you turn on this option then all feature option will be shown on listing detail page with checked / un-checked value, but if you turned off this option then only checked feature options will be shown at listing detail page.

Enable /Disable this button according to the listing scenario. Click on add new feature: To add the new feature in your listing.


Single Page Options:

Here you can select multiple options for your single page listing.

Price options

-Listing Price: Enable /Disable this button to add the listing price in your single page listing.
-Price type: Add price type.
-Minimum: Add minimum Price.
-Maximum: Add Maximum Price.
-Min-Max Interval: Add min-max interval.

Others

-Open House: Enable /Disable this button to add Open House in your single page listing.
-Image Gallery: Enable /Disable this button to add Image Gallery in your single page listing.
-Social Share: Enable /Disable this button to add Social share in your single page listing.
-Location / Map:  Enable /Disable this button to add Location/Map in your single page listing.
-Services Options: Enable /Disable this button to add Services options in your single page listing.
-Files Attachments Options: Attach files for your single page listing
-Allowed Types/Extensions: Select attachments files allowed types/extensions
-Floor Plans Options: Enable /Disable this button to add Floor plan options in your single page listing.
-Near By Options: Enable /Disable this button to add Nearby options in your single page listing.
-Show More/Less Description: Enable /Disable this button to Show More/Less description in your single page listing.
-Description Length :  Add description Length.
-Detail Page:  Select detail page view.
-Sticky Navigation: Enable /Disable this button to add Sticky navigation in your single page listing.

Suggested Tags:

Packages

Select Packages: Select listing type packages from Drop down.

Categories


You can add your listings from homevillas by follow the path:

- Navigate to admin panel and click on Dashboard > WP Real Estate Manager > Categories
Click the button “Add New Category”.

Name:  The name of the category is how it appears on your site.

Slug: The “slug” is the URL-friendly version of the name. It is usually all lowercase and contains only letters, numbers, and hyphens.

Parent: If you want to add your subcategory in your categories. 

Description: The description is not prominent by default; however, some themes may show it.

Icon: Select your category Icon.

Locations


Another stunning feature of Real Estate theme is location based search setting. With the feature, users can search the listings based on geo-location. Extended search & search results attributes can be set for this location based search option. It is very simple to set search options;
Click on WP Real Estate Manager > Locations

Currencies


To setup listing Currencies navigate: Dashboard > WP Real Estate Manager > Currencies  > Add New Currency

Currency Options: 

Currency Symbol: Select your listing currency symbol.
Conversion Rate: Set the conversion rate against your listing  currency.

Sent Email


You can check all your sent emails status via email details either your mail is sent to the users successfully or not. 

-Navigate your settings by follow the path:

Dashboard > WP Real Estate Manager > Sent emails

Here you get all listing template according to the actions. By edit them you can found your email details where you can get an information about the sent email either your user received your mail successfully or not.

Custom Order


Custom orders: Your custom orders are Display Here 

Listing Arrange Viewings


“Schedule a Viewing” form is conveniently located on the property listing detail page for you to request to arrange viewing for that particular listing. Complete the popup form with full details of your property and your availability, as soon as it is complete, press send message button. Admin can see listing arrange viewings at: Dashboard >> Listing Arrange Viewings

Add Listing Arrange View

Arrange Viewing ID: This will automatically generate by theme.
Listing Agent: Select Agent from drop down.
Viewing Agent: Select viewing agent.

Branches


Branches is another outstanding option offered by theme that allow you to add different branches of your office/company location. Admin can add branched details from: Dashboard >> Branched >> Add New Branches

Add New Branch

Add following options to add more branches of your location/company.

Choose Agent
Add Name
Enter Phone
Enter Email address
Enter Address 
Click 'Search This Location on Map' button on map to find exact location on map. Save and all Done!


Tags


- Navigate to admin panel and click on Dashboard > WP Real Estate Manager > Tags 
Click the button “Add New Tag ”.

Name:  The name of the category is how it appears on your site.

Slug: The “slug” is the URL-friendly version of the name. It is usually all lowercase and contains only letters, numbers, and hyphens.

Description: The description is not prominent by default; however, some themes may show it.

Agents dashboard


Listing Inquires


Admin can see and add their order information in Listings inquiries section.

-Listings Enquiry Option

Select Listing Agent
Choose Enquiry Agent

Packages


You can add packages to your paid listings.

Package name: Enter your package name.
Type: Select package type from this dropdown.
Listed Phone Number: Enable /Disable this button to add listed phone number in your package.
Website Link: Enable/Disable this button to add Agent site link in your package.
Package Duration ( Days ): Enter your package duration days in this field.
Number of Listing: Enter number of listings in the package detail.
Listing Duration ( Days ): Enter listing duration in days in the package detail.
Top Categories Listings: Enter number of top categories listings in the package.
Service Area Size: Enter your service area size according to your package listing.
No of Pictures Allowed: Enter the number of pictures allowed in the listings.
Number of Documents: Set No. of documents
Social Impressions Reach: Enable/Disable your social impressions reach the button.
Search Tags: Enter your search tags according to your package.  

-Price Table:

You can your price table in your package options.
Package Subscribe Action: Select your subscription action such as order detail, Add listing.
Add Package: Select your package for your listing price table.
Add Row: Add the row in your price table section.
Add section: Add the section for your price table.
Reset All: You can rest your all settings against your price table.


Agents


Real Estate Theme comes with the marvelous feature where you can add your Agents.Follow following steps to add new Agents on your listing site. You can add your Agents's data with different options.

-My profile 

Profile Image: Add your profile image by click on the button "Profile Image should have at least 250 pixels width and height."

Profile Type: Select your profile type according to your Agents role as "individual" or "Company ".
Profile Status: Select your profile status such as "pending", "active" and "Inactive".
Phone Number Enter your phone number in this field. 
Email: Enter your email address in this field.
Website: Enter your site link here as a Agents profile.
Biography: Add your biography against your Agents profile as an information.

- Social sharing:
 
 
Twitter: Enter your  Twitter account URL for sharing your profile on the social forum.
Google Plus: Enter your  Google Plus account URL for sharing your profile on the social platform.
 
 
-Mailing Information:
 
 
Country: Select your country from provided list.
State: Select the state from provided list.
City: Select the city from provided list.
 
 
-Find On Map:
 
-Address: Enter a Location.
-Latitude: Enter a latitude.
 
 -Longitude: Enter a longitude.
 
-Exact Location/Radius: Enable/Disable exact location/Radius button.
 
-Opening Hours
 
Here you can add your opening hour against your listing hours. 
 -Off days 
 
You can add your off days against your real estate listings.


- User Listings

Here you will find your listings against your user listings. All listing ads will appear in your listing.

-Order/Inquires
The Agents will found all the orders and inquiries in his order/Inquires section against your listings. 

-Shortlists

The Agents will found all his shortlist listings here.

-Packages

The Agents will found all his package details here.

-Search/Alert

The Agents will found all his ad alerts and search against his listings. 

Claim/Flags


You can claim or add flag on your listings from homevillas by follow the path:

- Navigate to admin panel and click on Dashboard > Homevillas  >Claim/Flag
Click the button “Add New Claim/Flag”.

Claim Id: Enter your claim ID.

Claim On: Select listing for claim.

User Name: Enter claimer name.

User Email: Enter claimer email.

Reason: Add your claim reason in detail.

Type: Select your claim type such as " Flag Listing", Claim ads.

Actions: Set claim action such as " pending", "Resolved".

WP Real Estate Manager Settings


Admin will be responsible for all back end setup and functionalities in the Homevillas  theme. Homevillas Theme settings helps admin to setup settings for dealers, packages, payments,  and features on etc your site. To do settings follow following path:

- Navigate to admin panel and click on Dashboard > Homevillas  > Settings
Click the button “Save all settings”. That's it. All done!

General Options

- User Header Login: Dashboard and Front-End login/register option can be hide by turning off this switch.Turn ON/OFF 

- Agent Dashboard: > Select Agent Dashboard page.

Select page for Agent dashboard here. This page is set in page template drop down. To create Agent dashboard page, go to Pages > Add new page, set the page template to 'Agent' in the right menu.

- Dashboard pagination: Enter your pagination limit in this text field.

-Package detail page: Please select a page for package details. This page is set in page template drop down. To create Agents dashboard page, go to Pages > Add new page, set the page template to 'Agents' in the right menu.

Listing Settings

-Free Listings Posting: Enable /Disable free listing button

-Listings Expiry Duration ( Days ): Set free listings posting expiry duration in days.

-Single Listing Gallery & Contact: Choose single listing gallery & contact display option.

-Single Listing Breadcrumbs: Choose whether to show breadcrumbs on listing detail page or not.

Submissions

-Search Result Page: Select Your search Result page

-Listings Publish/Pending On/Off: Enable/Disable listing Publish  button Turn On / OFF 

Announcements

-Announcement Title For User Dashboard : Please add text for announcement title that shows at user dashboard .

-Announcement Description For User Dashboard:

Please add text for announcement description that shows at user dashboard .
-Announcement Title For Restaurant: Please add text for announcement title that shows at restaurant page .
- Announcement Description For Restaurant: Please add text for announcement description that shows at restaurant page .
- Announcement Background Color : Select the color of your announcement.

Yelp Places Categories

Select your yelp categories in the provided list for your listings.

Mortgage Payment Calculator

Minimum Lease Year: Enter your minimum leasr year.

Maximum Lease Year: Enter your maximum leaser year.

Set No. Of Custom filds in Listings.

Term & Policy On/Off

Agents Settings

You can choose different functionality against your agent role.

Agent Settings

Agent Auto Approval: (If this switch set to ON new user will be auto approved. If switch is set to OFF admin will have to approve the new user.)


Add Agent Types
 
Add Fixed Price Options
 
Activity Notifications: Turn on this switch to show notifications for each user on agent dashboard. Click on save all settings All done !

Default Location

Here you can setup your current location:

-  Upload Cluster Icon
-  Upload Map Marker Icon
-  Set Zoom Level
-  Change Map Cluster Color
-  Map Auto Zoom
-  Map Lock
-  Enter Country
-  Enter City
-  Enter Complete Address

Click 'Search this location' button to add location to your site.!

Gateways

Gateways Settings

 - Paypal Settings
- Authorize.net Settings
- Bank Transfer Settings
- Skrill-Money Booker Settings


gateways

Locations

Location Setting

-Locations Levels : Select the levels you want to use for locations.
-Geo Location: Ask the user to share his location turn ON /OFF.
-Auto Country DetectionDo you want to detect country automatically using user's IP? Turn ON/ OFF 
-Address Maximum Text LimitAllowed address maximum text limit.
-Drawing ToolsDo you want drawing tools on the map? Turn ON/OFF
-Drawing Tools Line ColorColor used while drawing line or polygon on the map.
-Drawing Tools Fill Color: Color used to fill polygon on the map.
-Auto Complete : Do you want google to give suggestions to auto-complete?
-Circle Radius : Default Radius Circle.

Location Form Fields
-Location's Fields Selector: Select which location parts(Country, State, City, Town) you want to use on frontend. You can select only from location parts those you have selected on backend.


locations-settings

Map Near By Places

Add Nearby Places 

-Locations: Add all nearby places.
-Click on the button to add all nearby places aginst your locations.
- Add Icons according to the location distance in listing locations.


Social Auto Post

-Twitter : Enable /Disable  Turn ON/OFF.
- Facebook :  Enable /Disable  Turn ON/OFF.
-LinkedIn :  Enable /Disable  Turn ON/OFF.

Social Icons

Social Sharing Icons

- Social Sharing : Enable / Disable Turn ON/OFF
-Facebook : Enable / Disable Turn ON/OFF
-Twitter : Enable / Disable Turn ON/OFF
-Google Plus : Enable / Disable Turn ON/OFF
-Pinterest :Enable / Disable Turn ON/OFF
-Tumblr : Enable / Disable Turn ON/OFF
-Dribbble: Enable / Disable Turn ON/OFF
-Instagram: Enable / Disable Turn ON/OFF
-StumbleUpon : Enable / Disable Turn ON/OFF
-Youtube : Enable / Disable Turn ON/OFF
-Share More  : Enable / Disable Turn ON/OFF

ADS Management

Configure the options for your Ads management 

-Banner TitlePlease enter Banner Title

-Banner Style : Please Select Banner Style according to your requirement

-Banner Type :  Please enter Banner Type

-Image : Please Select Banner Image

-Banner Url : Enter your banner Url 

Target : Please select Banner Link Target

SMTP Configurations

To navigate  and configure your SMTP configurations by follow the path:

Homevillas Settings >> SMTP configurations.

-Enable SMTP to Send Emails? :Turn it on If you want to send Email Through SMTP..

-Send e-mail via GMail? :  Turn it on If you want to send Email Through Google Email Server..

-Use SMTP Authentication? : Turn it on If you want to use SMTP Authentication.., If checked, you must provide the SMTP username and password below

-SMTP Host Name : Enter your Smtp host here, It is name of your service provider

-SMTP Port : Enter your Smtp port here, e.g 25 or 465, This is generally 25.

-Connection prefix : Sets connection prefix for secure connections (prefix method must be supported by your PHP install and your SMTP host)

-SMTP username : Enter SMTP Username here

-SMTP Password : Please Enter SMTP Password here

-Wordwrap length : Enter Wordwrap length here, Sets word wrapping on the body of the message to a given number of characters.

-Enable debugging? : Only check this if you are experiencing problems and would like more error reporting to occur. Uncheck this once you have finished debugging.

-Sender e-mail: Sets the From e-mail address for all outgoing messages. Leave blank to use the WordPress default. This value will be used even if you do not enable SMTP. NOTE: This may not take effect depending on your mail server and settings, especially if using SMTPAuth (such as for GMail).

-Sender name: Sets the From name for all outgoing messages. Leave blank to use the WordPress default. This value will be used even if you do not enable SMTP.

Import/ Export

To Import and export data manually follow the path:

Dashboard >> Homevillas  Settings >> Import/ Export

Import Options: 

File URL: Input the Url from another location and hit Import Button to apply settings.

Export Options:

Generated Files: Here you can Generate/Download Backups. Also you can use these Backups to Restore settings.

Users Import / Export:

Zip file : Choose your file

Notification : Enable or disable this option

Password nag : To show password Enable or disable

Import / Export Users : To update users enable or disable 

Export All Users: Export users

File URL : To import users enter a file URL 

Import/Export Locations

File URL: Input the Url from another location and hit Import Button to import locations.

Generated Files: Here you can Generate/Download Backups. Also you can use these Backups to Restore Locations.

Import/Export Listings Type Categories

File URL : Input the URL from another location and hit Import Button to import restaurant type categories.

Generated Files : Here you can Generate/Download Backups. Also you can use these Backups to Restore Restaurant type categories.


Advance Settings

Demo User Login

Demo User login : Turn ON / OFF

Agent : Please select a user for Agents login


WP Real Estate Modules


Activity Notifications


The new exciting Add-On by Homevillas theme is now presented to you. This awesome feature notifies you about newly available listing and lets you select the listing rightly matched with your interests and skills. Follow following steps to setup alerts on your real estate portal and enjoy being Alert!

Navigate by follow the path to get your notifications against your listings.

Dashboard  > Homevillas  > Notifications.

Email Templates


Here comes the new Add-On of one of our popular themes of WordPress by ChimpStudio. This feature let you send emails regarding the listing  notifications and details with different email formats and templates as you can wish for your listing site. 

To Setup Email Templates navigate :
Dashboard > Homevillas  > Email templates  > Add New
You can edit the email as you like by using many of the given options.
2 templates are also given for your email pattern.

First of all you need to select the type of Email template. After that You can use different variables to create your own Email Template: 

Common Variables for email templates:

  • site name: [LISTING_SITE_NAME]
  • admin email: [LISTING_ADMIN_EMAIL]
  • username: [ENQUARY_USER_NAME]
  • site url: [LISTING_SITE_URL]
  • Listing title: [LISTING_TITLE]
  • password: [ENQUIRY_USER_PASSWORD]
  • LISTING_ALERT_TITLE
  • LISTING_ALERT_LIST

Note: Number of variables depend upon Add-Ons installed on your site. !

Email Template Settings

To configure emails, you need to make following settings in sidebar:

  • Enable/Disable Email Notification:
  • Select Email Type

Click Update Button and All Done!

Homevillas Shortlists


New incredible feature offered in Wp Real Estate theme is shortlist Real Estate listings. To Shortlist Real Estate listing, Login via Individual or Company account and click on the heart button and add the Real Estate listings to respective favorites.  

Here user can view his/her shortlisted property listings on dashboard.

Listing Alerts


The new exciting Add-On by Homevillas theme is now presented to you. This awesome feature Alert you about newly available listing and lets you select the listing rightly matched with your interests and skills. Follow following steps to setup alerts on your real estate portal and enjoy being Alert! Navigate by follow the path to get property listing alerts.
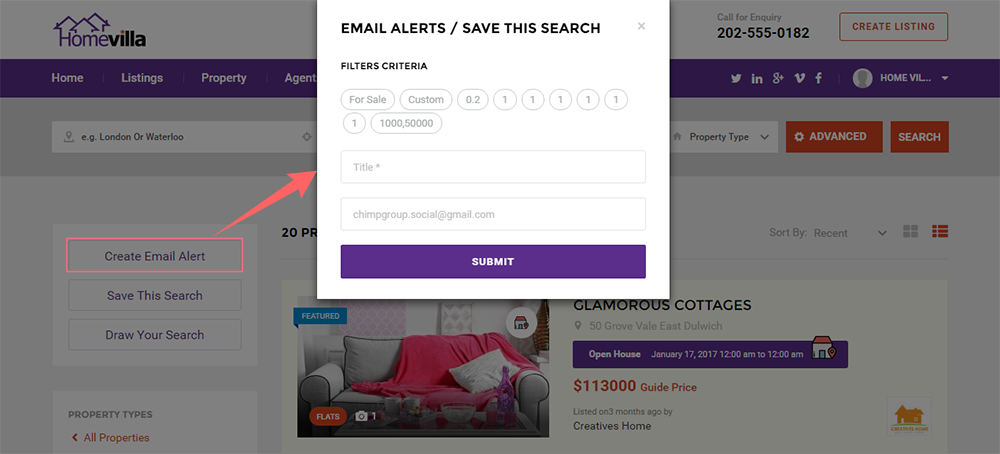
HOW TO SAVE SEARCH?

This stunning and flexible feature notifies you about newly available listings and lets you select the listings rightly matched with your interests abased on your searches. Follow procedure that will help you save your searches.

  1. First of all filter your desired listings using Advanced Property search filter.
  2. Click "Save this Search" button to open Alerts box.
  3. Enter Listing Alert Name
  4. Enter Email address
  5. Now, Click "Submit button" to set Alerts. All done!

Frequency Settings

There are some frequencies of listing alert which are given below and can be set from: Homevilla Settings >> Listing Alerts:

Annually:
In this frequency, you allow user to set alert frequency to annually. If this switch is on, you don’t allow user to set alert frequency annually, and if it will be off you have allowed user to set alerts frequency to annually.

Biannually:
In this frequency, you allow user to set alert frequency to Biannually. If this switch is on, you don’t allow user to set alert frequency Biannually, and if it will be off you have allowed user to set alerts frequency to Biannually.

Monthly:
In this frequency, you allow user to set alert frequency to monthly, if this switch is on, you don’t allow user to set alert frequency monthly, and if it will be off you have allowed user to set alerts frequency to monthly.

Fortnightly:
In fortnightly frequency, you allow user to set alert frequency to fortnightly, if this switch is on you don’t allow to user to set alert frequency fortnightly, if it will be off you have allowed user to set alerts frequency to fortnightly.

Weekly:
In weekly frequency, you allow user to set alert frequency to weekly, if this switch is on, you don’t allow user to set alert frequency weekly, and if it will be off you have allowed user to set alerts frequency to weekly.

Daily:
Again in daily frequency, you allow user to set alert frequency to daily, if this switch is on, you don’t allow user to set alert frequency daily, and if it will be off you have allowed user to set alerts frequency to daily.

Never:
And in this, you allow user to set alert frequency never, if this switch is on, you don’t allow user to set alert frequency to never, and if it will be off you have allowed user to set alerts frequency to never.

Blogs


Adding New Blog Post


How to Add New Blog

All above options can be availed while adding a new Blog. Follow the following procedure to add new Blog;
Step 1- Navigate to your theme back end or Admin Panel and go to Post Option on the left hand side & click on it.
Step 2- Click on Add New post, an area will open on right side of Add new Post where you can Add title, description and achieve all other customized featured listed above.
Step 3- Make settings of your choice, Publish the page, That's it your blog has been added on your site successfully!!

Not only you can add new Blog as and when you require on your site but also can make following customization in blog options in EduLMS theme;

General Settings for Blog

  1. Add Titles/ Sub-Titles for Blogs.
  2. Add description of your choice
  3. Set translation option for the blog
  4. Assign category to blog
  5.  Turn Social sharing of Blog ON/OFF
  6. Add tags for the Blog
  7. Show or Hide Author of the Blog
  8. Choose sidebar for the blog view and set it’s layout
  9. Select the page where you want to display the Blog

Sub-header Options for Blog:

  1. Choose Sub-Header of your choice for the blog from drop down
  2. Turn Image On/Off for the blog
  3. Set Background of your choice for the blog.
  4. Turn parallax Bg image ON/OFF

ADD NEW IMAGE GALLERY

You can add your image gallery for your posts. You can add more tan one image in your blog image gallery to showcase  your listing view.

Blog Views


There are attractive views to display blogs.

To add Blog  (News), you can use "Blog" shortcode

Step-1. Navigate to admin panel, Edit page > Click CS: Page element "Blog"
Step-2. To display all Blogs on frontend, You need to select Choose Category from multi select than they will show you all on frontend.
Click Insert button. All Done!
Note: There are 11 views available to display Blogs (View1 to View11, You can use them as you need!)

Using Page Builder on Page


Follow the following steps to use page builder on page;

Step-1 Navigate admin side of theme and click on pages. Click on Add New Page or edit any existing page. Give page title and enter description for it.
Step 2- Go to lower section of the page and find Add Page Section. Click on it and then click on the Add Element button. As soon as you click on it, a popup window will open.
Step 3- Select an Element of your choice. After that click on edit icon (a wrench type icon). As soon as you click on it, a popup window will open again. Here you need to selectcategory of your element according to your needs. After that click on the save button & publish the page, that’s it. Your element is well added with help of page builder.

Menus


Creating Menu


WordPress gives you option to create a custom menu very easily. Menu usually serves as a navigation menu for your site. The built-in WordPress Menu feature allows you to create your own custom menus in place of your theme's default menus. To create a menu, follow the steps given below;

Step 1- Navigate to theme admin panel and go to Appearance.
Step 2- As soon as you click the Appearance button, few option will open under it. Now find the option of Menu there.  
Step 3- Click on Menu and it will take you to a new page. Click on create Menu. Give title/name in the input field there & hit the save button. All done & Menu has been created!

Adding Items to Menu


Once the Menu is created, it is important to add menu options/items in it. You can add any page, category or custom link in it. You can add items in menu by following method;

Step 1- Open the theme admin panel and go to Appearance. As you click (or hover) the Appearance, a list of option will open.
Step 2- Now click on Menu, it will open a page for you. Find the the option of Edit Menu. (Mostly the page that opens is already Edit Menu Page. You do not need to find it)
Step 3- On Edit Menu section, find the "Select a menu to edit" and click it. A drop down will open, it will show you all menus that you have added already. Select a menu to edit OR for which you want add option.
Step 4- Select the items from the available option (category, pages, custom links, etc)and click on Add to menu. Hit the save Menu button & your Menu has been customized to your choice!

Real Estate theme Menu Settings


This guide to the Menu setting covers the basic tasks a user may carry out when using the built-in menu editor of Homevillas theme.

If you have imported dummy data, You can set location of Menu through this way;
Step 1- Navigate to theme admin panel and click Appearance. Few options will open under it. Now find the option of Menu there.
Step 2- Select a menu from the drop down. Save the Menu.
Step 3- After that click on the "Manage Locations". Click on the drop down select "Main Menu" or as you want. Now click on the button "Save Changes". All done!     

Note: If you did not imported dummy data, follow the method given under title "create Menu."

Real Estate theme Menu Styling


Following customization are offered by Homevillas Theme by Chimp Studio;

  • Change background Color of the header
  • Change Menu Link color
  • Set Menu Hover / Active Link color
  • Submenu Hover Background
  • Submenu Link Color
  • Submenu Hover / Active Link Color

To achieve all these settings, Follow the steps given below and made menu to be colorful:

Step 1- Click(hover) on the Appearance from admin panel. Now find the "CS Theme Options", Click on it.
Step 2- Click on "Colors" tab, few options will open under it. Click on "HEADER" option, It will navigate to "HEADER "
Step 3- Set the colors of menu as per your requirement. Save Settings & All Done

Sidebars


Creating Sidebar


Chimp Studio theme allows you to easily create and apply to a page or post. It’s a great way to customize each page with a unique sidebar. Please see the details given below to understand how you create a sidebar.

Step 1 – Navigate to Appearance > CS Theme Options > Sidebars > Create New button, give it a name and save it. You can add as many sidebars as you need.
Note: You can delete existing sidebars from the same section.
Step 2 – Once you are done, you need to add Widgets to the sidebar you just created.
Step 3 – Navigate to Appearance > Widgets and find your sidebar on the right side
Step 4 – On the left hand side you will see all the widgets you can use, simply drag and drop the widget you want into your sidebar on the right hand side.
Step 5 – Make sure you click Save to save the widgets added to your sidebar.

In short, you can add widget via following path;
Navigate to Admin side -> Widget -> Select a widget -> Drop this widget in your newly created custom side bar.

Sidebar for Post/Pages


All created sidebar can be assigned to any page that accepts sidebars, or for any post.  Please find the information given below on how to assign sidebars to pages and posts.

Step 1 – Edit or create a new Page or Post in your WordPress Admin Panel.
Step 2 – Now Add/Edit the page/post where you want to use custom side bar.
Step 3 – Click on General Settings in the bottom of the page.
(Here you can select layout type for your sidebar too, from Right/Left or Full width)
Step 4 – Select your custom created Sidebar from the drop down.
Step 5 – When finished, publish the page or post to save the settings.

Sidebar Position

Note – Chimp Studio theme offers a sidebar position option for Sidebar, this can be chosen globally in theme options or individually per page or post. The page option overrides the theme option. However, the theme option will control the page option as long as the page option is set to Blog page  “Default” from: Dashboard >> Settings >> Reading >> Your latest posts

Sidebar for Sections


Chimp Studio themes are full of all kind of freedom to set your site as per your desires. You can adjust look & feel the way you like. Not only you can add sidebar a full page but also you can set sidebar for a particular section of the page. For example; if you want to use sidebar for a single element like slider, Accordion, Call to Action etc. you can do it very easily. Follow the instructions given below to achieve this functionality.

Step 1- Go to the Admin Side of the theme and Click on Edit page option. You can edit any existing page, or you can create a new page and click on its edit section in the lower section of the page.
Step 2- Click on Add Page Sections from the lower section of the page. It will add a section on the page.
Step 3- Click on the  icon which is at opposite to "Add Element" heading. Set layout of your choice for the sidebar from here.
Step 4- As soon as you select layout (Right/Left), you will see option below to select sidebar of your choice. Select the sidebar & publish the page. Your selected sidebar will appear on the selected section.

Note: if you select full width option from layout, sidebar selection option will not work. It will only work on Right or Left layout.

Adding Widgets in Sidebar


Chimp Studio includes several custom widgets. All widgets are found in the Widgets section of the WordPress admin. Widgets can be added to any sidebar. Widgets can even be added on sidebar by Dragging & dropping them on the sidebar and then selecting the sidebar for the pages or Posts. There are various fields and settings to choose for each individual widget; all are self-explanatory. You can put as many widgets as you want inside of a sidebar. Please read the method given below for information on how to add widgets in sidebar.

Step 1 – Navigate to Admin side > Appearance > Widgets.
Here, on the left hand side, you will find full list of all widgets that you can use in sidebars. The right hand side shows all the different sections you can add widgets to. You will find sidebars on right side too.
Step 2 – Simply drag and drop the widget you want into the widget section you want on the right hand side.
Step 3 – When finished, make sure to click Save in the widget editing box to save the widgets recently added to your sidebar.

CS Theme Options


Go to your Dashboard  by following the path:

Appearance >> CS theme Options 

General  : Configure your Logo , Header ,Subheader, Footer , Social Icons , Social Sharing  settings

Color : Configure your overall theme color according to your requirements.

Typography/ Fonts : Configure your Fonts and other settings.

Sidebar : Configure your Sidebar settings.

Footer Sidebar : create your Footer sidebars

API Settings : Configure your API settings with your social Icons.

Auto Update : Configure your auto update settings to update your theme.

Import / Export : Import and export data via .XML files by using this options.

Maintenance Mode : Configure your settings regarding maintenance mode

Global Settings


Global/General settings will help you setup settings for your entire site layout including Responsive, Excerpt and Map settings. To do following settings:

Navigate Admin side > Appearance > CS Theme options > General > Global 

  • Select Layout - (Boxed/ Full width)
  • Responsive ON/OFF - Enable the option to set your site mode as 'Responsive'
  • Excerpt (in words) - Add general excerpt length for all of your posts
  • Map Style - Another Fresh feature by Chimpstudio, Here you can choose your desired map style.

Header & Logo Settings


  • Select Default Header Style (Default or Modern) as you need
  • Upload Logo: Browse to add logo image (png)
  • Logo Modern: Upload Logo if you are using Modern Header Style, Browse to add logo image (png)


Color Settings


Colors for a website design are almost as important as the overall design itself. Color affects our feeling, perceptions, and interactions. You can use colors to make a user feel welcomed, comfortable, relaxed, and secure. With Chimp Studio Homevillas Theme, you can set color for your whole site . Here you can change colors for following sections;
- General (Theme Color)
-Header
-Footer
-Headings

You need to follow the following path to achieve this:

Step-1 Navigate to theme admin panel and click on the Appearance, option will open under it. Find CS Theme options from there.
Step-2 Click on CS theme options >> Colors >> “Save all settings”. That's it. All done!

Typography/Fonts


To Set Default Typography and Text Fonts

Go To Appearance >> CS Theme options >> Typography/Fonts

  1. Custom Font: By default theme functionality regarding custom fonts is that you can upload Custom font on your site that will be automatically set to your whole website front end, But will not come in font family section.
  2. Google Fonts: Set the attributes for body text, Content attribute, Main Menu, Heading Font, & Widgets Font as per your requirement, Click the button “Save all settings” All done!
     

Footer


To configure your footer:

Navigate Admin side > Appearance > CS Theme options > General > Footer

  • Footer section - Enable/Disable Footer Area
  • Footer Widgets - Enable/Disable Footer Widget Area
  • Footer Logo - Choose footer logo from media gallery
  • Footer logo Link - Add link to footer Logo
  • Social icons
  • Copyright Text
  • Add Payment gateways images

Footer Sidebar


Homevillas Theme offer customized sidebars to setup footer more flexibly as you want for your site. Follow following steps how you can setup footer using Homevillas Theme .

Step-1  Select "Footer Sidebar" (as per No. of Columns)
Step-2 Add Footer sidebar as per your choice, “Save all settings”.

Now, after selection of Footer sidebar from CS Theme options, The selected sidebar will appear in: Dashboard >> Appearance >> Widgets >> Footer Sidebar (Now here you can add widgets as per your desire to footer). That's it. All done!

Import/Export


Theme Options Backup

Chimp Studio Introduce the stunning feature of  import & export of your theme settings & widget settings It  will just possible with a single click. Follow the given path.

Dashboard -> Appearance-> CS theme options-> Import/Export tab 

Here you can generate your a backup of your current theme settings. As soon you click on "generate"backup button. backup file will generate with current date & time. As soon you will click you will get other option for your created backup file. for example Download your created file, Restore it, Delete it, & restore it. At the same time you can create other backup of your other theme settings. Create backup files much you required.

Widgets Backup

To generate backup of your widget those you have in your site for permanent you just follow the same steps as you followed for theme settings  backup. Please follow the path

Dashboard -> Appearance-> CS theme options-> Import/Export tab 

You can Restore it, Delete it, & restore it. At the same time you can create other backup of your widgets settings. The impressive feature is you can also see there current widgets settings there before make backup of them.

Maintenance Mode


Homevillas Theme offer unique maintenance mode page settings with the help of which you can be able to set any page as your maintenance mode until your site is in development stage .

-Turn Maintenance mode 'ON' to enable it.
- Logo On/Off - Switch 'ON'the button if you want to show logo on page
- Social Contact On/Off - Switch 'ON'the button if you want to show social icons
- NewsLetter - Switch 'ON'the button if you want to show NewsLetter on page
- Header Switch On/Off - Switch 'ON'the button if you want to show NewsLetter on Maintenance page
- Footer On/Off - Switch 'ON'the button if you want to show footer on page
- Select your desired MaintenanceMode page (pf under construction) and all done!

Social API’s Configurations


Facebook APP


Please follow following steps to create and configure Facebook API's:

1. Login to Facebook

Before creating a developer account, login in to your Facebook account.

2. Create new Facebook app

After login, Open link to create new Facebook App from here: Create New Facebook APP .Choose My Apps in the header navigation and select Add a New App.

3. Choose Category

Choose the category you want to add.

4. Choose a Name

Choose a name for your app and select Create New Facebook App ID. Choose a category for your app.

5. Protect your App Secret

Add Captcha details to avoid robotic spamming.

6.Enable Development Mode

New Facebook apps exist in development mode by default. This limits published actions and related objects such as friend tagging to Facebook Timelines owned by a developer of the application. Once your application is ready for public use you can switch from development mode to public mode to allow your app to interact with Facebook accounts not associated with your app.

7.Select Platform

Choose the platform you want to add.

8. Add your site URL (Redirect URL)

Keep in mind, this is the most sensitive step while configuring API's to add valid redirect url of your site in Face book APP.

8. Get App ID and Secret Key

Copy App ID and App Secret Key and save changes.

After creating App, Add API keys in API settings from: Homevillas Settings / API settings / Facebook and All Done!

Twitter APP


Follow follow steps to Create Twitter App and API configurations:

1. Sign in with your Twitter Account

2. Visit the Twitter Developers’ Site. 

Once you’re logged in, you will need to visit Twitter’s app website. This can be found at apps.twitter.com.

3. Create a New Application

It’s time to create application. To do this, click on the “Create a new application” button.

4. Fill in your Application Details

Once you’ve done this, make sure you’ve read the “Developer Rules Of The Road” blurb, check the “Yes, I agree” box, fill in the CAPTCHA (don’t you just love them) and click the “create your Twitter Application” button.

5. Create Access Token

We now need to authorise the Twitter app for your Twitter account. To do this, click the “Create my access token” button.

6. Make a note of your OAuth Settings

Once you have done , all you will need are:
Consumer Key
Consumer Secret
OAuth Access Token
OAuth Access Token Secret

After creating App, Add API keys in API settings from: Homevillas Settings / API settings / Twitter and All Done!

LinkedIn APP


To create a LinkedIn App, go and visit: https://www.linkedin.com/secure/developer.

You need to be logged in to your LinkedIn account to be able to access their developer page.

1. Create Application

2. Fill in your Application Details

Click the “Add New Application” link and fill in the following required fields

1. Application Name – Enter your application name, usually your site’s name.
2. Description – A short description of your site
3. Application Logo
4. Application Use – Select a use for your application.
5. Website URL – Home page URL where the integration will go live. This should end in a / (ex:http://www.mysite.com/)
6. Business Email:
7. Business Phone:

3. Add Valid Redirect URL

4. Get Secret Keys

After creating App, Add API keys in API settings from: Homevillas Settings / API settings / LinkedIn and All Done!

Google+ APP


To Create Google+ APP, following given steps:

1. Go to the Google Developers Console

2. Create Project

From the project drop-down, select a project , or create a new one.

3. Create OAuth Client ID

4. Configure Consent Screen

5. Add Valid Redirect URl:

Add following valid redirect url in your app as well as theme's API settings: http://homevillas.chimpgroup.com/wp-login.php?loginGoogle=1 (Replace your site's link)

6. Get Secret Keys

- Enable API to Generate Google API Key

Navigate Dashboard tab to enable API from : https://console.developers.google.com/apis/library?

- Create Google API key

- Copy Google API key

Click the API Key to create Google API key

After creating App, Add API keys in API settings from: Homevillas Settings / API settings / Captcha and All Done!

Captcha APP


Follow following Steps to Create Google reCAPTCHA App:

1. Visit Google Recaptcha Site 

Start creating your Google reCAPTCHA App. This can be found at https://www.google.com/recaptcha/intro/index.html

2. Get reCAPTCHA

Click on Get reCAPTCHA button in header.

3. Fill in your Application Details

After adding correct details. Press 'Register' button to create App.

4. Get Your reCAPTCHA API Keys

After creating App, Add API keys in API settings from: Homevillas Settings / API settings / Captcha and All Done!